“Be like an axolotl—smile big, stay weird, and grow at your own pace!”
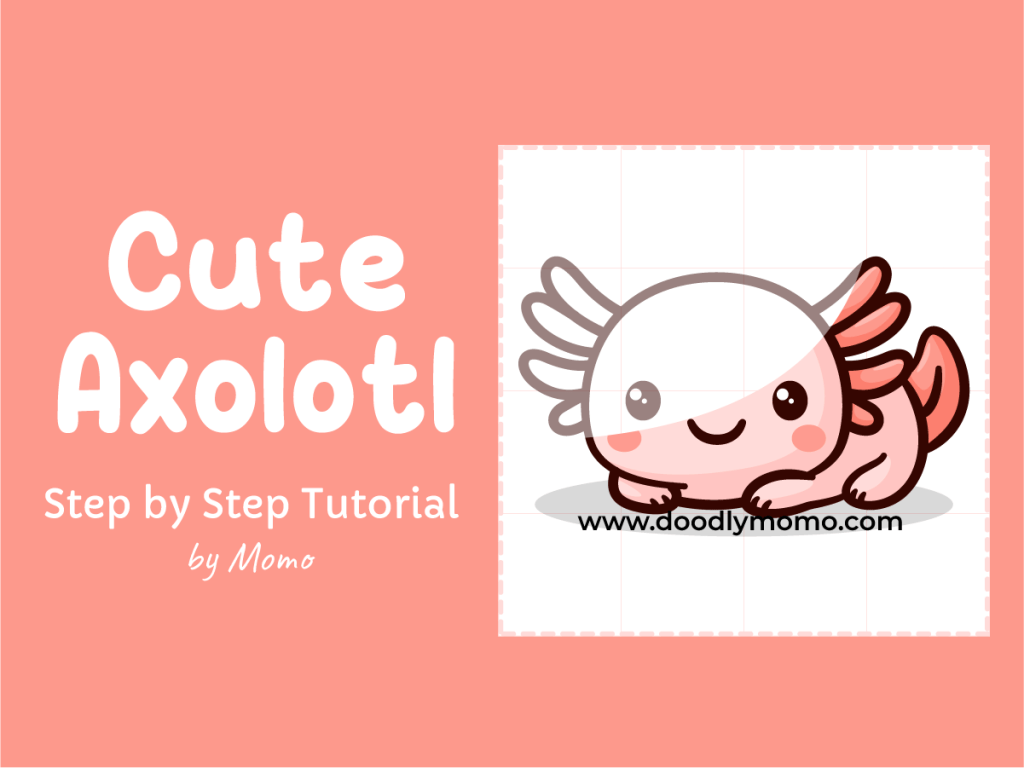
Step by Step Drawing Tutorial of a Cute Axolotl for Kids
Learn how to draw a cute axolotl with this easy step-by-step tutorial made just for kids and beginners! This adorable underwater creature, known for its smiley face and frilly gills, is a fun drawing idea for ocean-themed lessons, homeschool art time, or just a relaxing creative break. Follow along and bring your own happy axolotl to life with simple shapes and big kawaii eyes!
Don’t forget to prepare your materials. Please see my post on how to use the Grid Line Method here. By the way we have prepared a free downloadable Grid Lined Paper that you can use, click the link to download a copy. Please note that these free downloads are intended for personal use only.💖
You may print it on an A4 sized paper or if you want to draw on a smaller scale, you may print 2 copies on one A4 sized paper.
Let’s Draw a Axolotl!
Step 1: First, draw a big circle for the head of the axolotl, ensuring it is proportionate to the body you will create later. This circle will serve as the foundation for the axolotl’s distinct features, such as its large, expressive eyes and the frilly gills that extend from its head. Once you’ve perfected the shape, take a moment to decide on the placement of the eyes, which will give your drawing personality and charm.

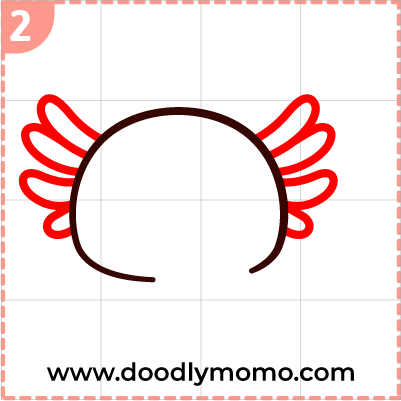
Step 2: Next, draw four frilly gills on both sides of the head, ensuring that they are elegantly shaped to mimic the delicate flow of underwater life. Make the bottom ones smaller than the top ones, creating a harmonious gradient that adds depth and character to your drawing. Pay attention to the curves and intricate details of each gill, as this will enhance the overall lifelike quality of your artwork, making it appear as if the creature could slip into the water at any moment.
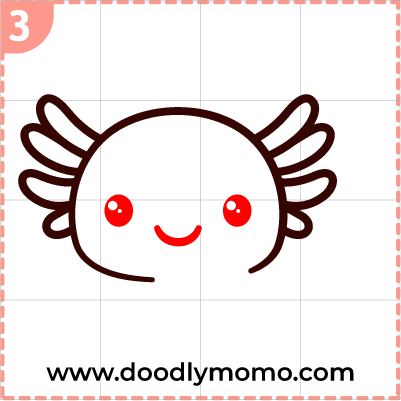
Step 3: Draw two circles for the eyes, taking care to make them proportionate to the rest of the face. Don’t forget to add a small circle inside each eye for additional glares, as this detail will bring life and personality to your drawing. To create a cheerful expression, add a cute curve for the smiling mouth, ensuring that it aligns harmoniously with the eyes.
Step 4: Start by drawing one of the front legs of the axolotl. Be sure to capture the soft, feathery look of the leg, which is a key feature of this interesting creature. Also, sketch the chest area to connect smoothly with the leg. This helps you show the overall shape of the axolotl, highlighting its playful look.

Step 5: Draw another front leg of the axolotl, ensuring that it mirrors the first leg in both shape and size. Pay attention to the details, such as the small digits on each foot, which should be visible and slightly rounded, adding to the axolotl’s unique charm.

Step 6: Then, draw the back of the axolotl, carefully connecting it to one of its back legs, ensuring that the curvature of the body flows seamlessly into the limb. Take your time to capture the unique texture of the axolotl’s skin, adding gentle curves and lines that emphasize its wet, smooth surface. As you outline the back, consider the overall proportions and make adjustments as necessary to reflect the axolotl’s distinct, aquatic form.

Step 7: Lastly, draw the tail of the axolotl. This feature should be sturdy and flowing, highlighting the aquatic nature of the creature. Focus on its shape, which looks like a rounded triangle that tapers at the end. Adding gentle curves can give a sense of movement, making the axolotl look like it’s swimming smoothly through the water. Now that you’ve finished your adorable axolotl drawing, march into our step-by-step Elephant drawing tutorial and learn to draw a gentle giant next!

Here are all the detailed steps for your easy reference, ensuring that you can follow along without any confusion as you work through the process. Each step is meticulously outlined to provide clarity, allowing you to navigate through the procedure with ease and confidence. By following this structured approach, you will minimize the chances of making mistakes and increase your efficiency as you progress. Feel free to refer back to this guide whenever you need a reminder or a clearer understanding of the process.

Did you know?
Axolotls are super cool animals that look like smiling underwater dragons! They live in lakes in Mexico and are famous for their frilly pink gills that stick out like little feathers on the sides of their heads. What’s even cooler? If an axolotl loses a leg—or even part of its heart—it can grow it back like magic! These creatures never grow up like other animals do—they stay in their baby form forever, which makes them extra adorable. It’s like they’re nature’s version of Peter Pan!

Here’s some more kid-friendly information:
- Axolotls always look like babies! They never go through full metamorphosis like frogs do—they keep their cute baby features forever.
- They can regrow body parts! If an axolotl loses a leg, tail, or even part of its heart, it can grow it back like a real-life superhero.
- Axolotls are only found in Mexico. They originally come from the lakes near Mexico City, especially Lake Xochimilco.
- They love to smile. Well, it just looks that way! Axolotls have permanent “smiley faces” that make them extra cute.
- They breathe in two ways. Axolotls use their frilly gills to breathe underwater and also use their lungs to gulp air from the surface.
- They don’t have eyelids. Axolotls never blink! They don’t need to since they live in water and their eyes stay moist.
- Their name is from the Aztecs. The word “axolotl” comes from Nahuatl and is linked to a mythical god who turned into a salamander.
- Axolotls come in many colors. Some are pink, white, brown, gray, or even black—each one is unique!
- They’re super quiet pets. Axolotls don’t bark, meow, or chirp. They’re peaceful and calm underwater buddies.
- They’re endangered in the wild. Even though axolotls are popular in aquariums, they’re very rare in nature, so scientists are working to protect them.
Did you know? Axolotls can regrow their limbs, spine, and even parts of their heart and brain! For a feathered twist, check out our step-by-step Turkey drawing tutorial next!
📌We are in Pinterest too! Check us out and save our pins as reference! ♥
You can also check and buy vector files and images from our Adobe Stock link below, where you’ll find a diverse collection catering to all your creative needs, ensuring that you have quality visuals for any project, whether it be for web design, marketing, or personal use.
Thank you for reading! We hope you found this article insightful and enjoyable. Please have a look at our other step-by-step tutorials, where you can discover a variety of adorable dog breeds, including tips on training, grooming, and care. Whether you’re a seasoned dog owner or considering bringing a new furry friend into your home, our comprehensive guides are designed to help you along the way. Happy Drawing!


Leave a comment