“Hop toward your dreams, stay soft on the outside, and always believe in a little magic!” 🐰
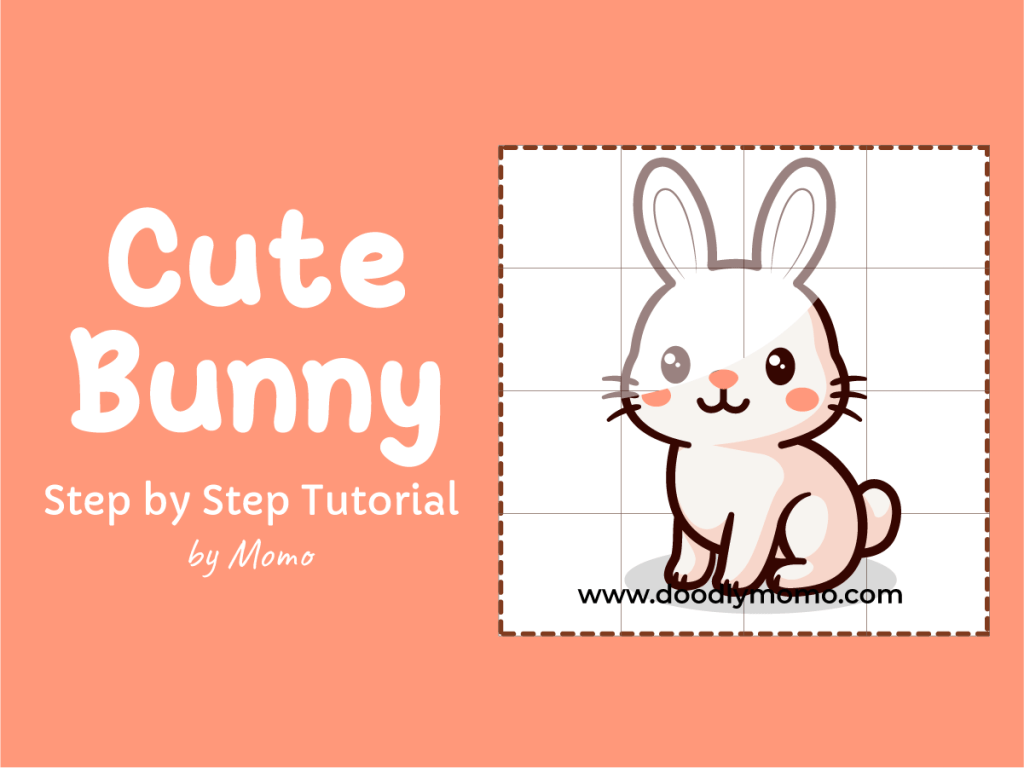
Step by Step Drawing Tutorial of a Cute Bunny for Kids
Hop into creativity with this easy step-by-step tutorial on how to draw a cute bunny! Perfect for kids, beginners, and animal lovers, this fun drawing guide uses simple shapes and friendly features to help artists sketch an adorable cartoon bunny with big ears and a fluffy tail. Ideal for Easter crafts, springtime projects, homeschool lessons, or just a cozy art day at home! 🐰
Don’t forget to prepare your materials. Please see my post on how to use the Grid Line Method here. By the way we have prepared a free downloadable Grid Lined Paper that you can use, click the link to download a copy. Please note that these free downloads are intended for personal use only.💖
You may print it on an A4 sized paper or if you want to draw on a smaller scale, you may print 2 copies on one A4 sized paper.
Let’s Draw a Bunny!
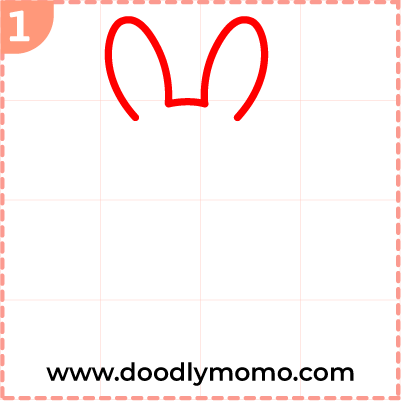
Step 1: First, draw both ears of the bunny and the top of the head. Make sure to give the ears a soft, rounded shape, as this will add to the cuteness of your bunny. You can decide if you want the ears to be upright, giving the bunny a curious look, or flopped down for a more relaxed appearance. For the top of the head, create a gentle curve that flows smoothly between the ears, ensuring that it captures the adorable essence of a bunny.
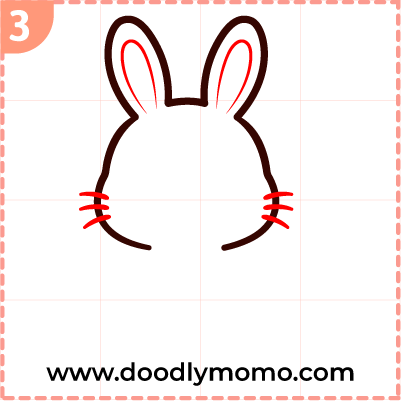
Step 2: Next, draw the both cheeks of the bunny, ensuring to give them a soft and rounded appearance for that adorable character. Make sure the bottom is a bit larger than the top to create an appealing balance and convey a sense of cuteness. As you sketch, consider adding a slight curve where the cheeks meet the face, which will give your bunny a more three-dimensional look.

Step 3: Draw thin lines for additional ear details, making sure to vary their lengths and angles to add a more natural and dynamic look. Then, add three whiskers on each side of the cheeks, positioning them at different heights for a more realistic appearance. Remember to curve the whiskers slightly to mimic how they would naturally extend from the face, enhancing the overall lifelike quality of your drawing.
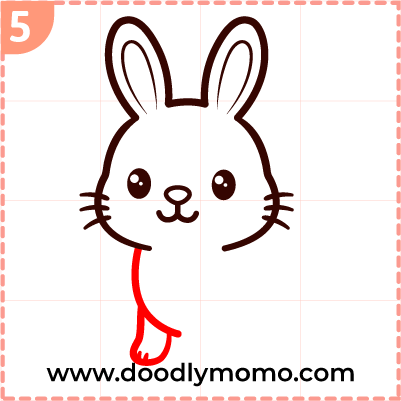
Step 4: Next, draw two circles for the eyes, ensuring they are evenly spaced apart to maintain proper facial symmetry. Add small circles for glare within each eye, which will give the character a lively and engaging expression. Below the eyes, sketch an oval for the nose, allowing it to slightly protrude to enhance the three-dimensional effect. For the mouth, draw two curved lines that gently arch upward at the ends, suggesting a friendly smile.

Step 5: From the chin, draw a smooth curve that gracefully outlines the body of the bunny, starting from just below the chin and arching outward to capture its rounded form. As you continue, add delightful details like fluffy tufts of fur to make the body appear soft and inviting. Then, with care and precision, draw one of the front legs of the bunny, ensuring it is positioned in a natural stance that conveys a sense of playfulness. Be sure to include tiny toes and the gentle curve of the paw, enhancing the overall charm of this adorable creature.
Step 6: Next, draw the second front leg of the bunny, ensuring that it mirrors the first leg in both size and positioning. Start by sketching a gentle curve that extends from the body, creating a soft, rounded shape that represents the fluffy fur of the leg.

Step 7: Lastly, draw the back of the bunny, ensuring to capture its soft and fluffy texture. Start by sketching the back leg, giving it a rounded shape that suggests the bouncy nature of the bunny. Then, draw a big curve for the tail of the bunny, making it look round and puffy, as if it’s the perfect finishing touch to this adorable creature. Now that you’ve finished your cute bunny drawing, hop over to our step-by-step Bulldog drawing tutorial and learn how to draw another lovable animal!

Here are all the detailed steps for your easy reference, ensuring that you can follow along without any confusion as you work through the process. Each step is meticulously outlined to provide clarity, allowing you to navigate through the procedure with ease and confidence. By following this structured approach, you will minimize the chances of making mistakes and increase your efficiency as you progress. Feel free to refer back to this guide whenever you need a reminder or a clearer understanding of the process.

Did you know?
Bunnies are gentle, fluffy animals with big ears, twitchy noses, and powerful back legs that help them hop super high! They love to munch on veggies like carrots and leafy greens, and they use their noses to sniff out tasty snacks. A bunny’s ears aren’t just cute—they help them hear really well and stay cool in warm weather. Bunnies can be very social and playful, and they show happiness by doing a joyful jump and twist called a “binky!” Whether they’re nibbling, hopping, or snuggling, bunnies are some of the sweetest and most lovable animals around!

Here’s some more kid-friendly information:
- Bunnies can jump really high— up to 3 feet in one hop!
- A happy bunny does a “binky,” which is a twisty jump in the air.
- Their big ears help them hear very well and also keep them cool on hot days.
- Bunnies have 28 teeth, and they never stop growing!
- They love to chew, so they need lots of safe toys and snacks to keep their teeth healthy.
- Bunnies are very clean—they groom themselves just like cats do.
- A baby bunny is called a kit, and a group of bunnies is called a fluffle or colony.
- Bunnies don’t make loud sounds, but they communicate with nose wiggles, thumps, and body language.
- They can see nearly all the way around them, except for a small blind spot right in front of their nose.
- Bunnies are crepuscular, which means they’re most active at dawn and dusk!
Did you know? A bunny’s ears can rotate almost a full circle to detect sounds from all directions! For another fluffy and cheerful friend, check out our step-by-step Duckling drawing tutorial next!”
📌We are in Pinterest too! Check us out and save our pins as reference! ♥
You can also check and buy vector files and images from our Adobe Stock link below, where you’ll find a diverse collection catering to all your creative needs, ensuring that you have quality visuals for any project, whether it be for web design, marketing, or personal use.
Thank you for reading! We hope you found this article insightful and enjoyable. Please have a look at our other step-by-step tutorials, where you can discover a variety of adorable dog breeds, including tips on training, grooming, and care. Whether you’re a seasoned dog owner or considering bringing a new furry friend into your home, our comprehensive guides are designed to help you along the way. Happy Drawing!


Leave a comment