“Stand tall, stay balanced, and always be your bright, fabulous self—just like a flamingo.” 🦩✨
Step By Step Tutorial
Unleash your creativity with our passionate Flamingo drawing tutorial! Follow each engaging step to bring these whimsical birds to life, enhancing your skills and imagination. Prepare your materials and embrace the artistic process while discovering fascinating facts about Flamingos. Let’s celebrate your unique artistic journey! 🦩
Don’t forget to prepare your materials. Please see my post on how to use the Grid Line Method here. By the way we have prepared a free downloadable Grid Lined Paper that you can use, click the link to download a copy. Please note that these free downloads are intended for personal use only.💖
You may print it on an A4 sized paper or if you want to draw on a smaller scale, you may print 2 copies on one A4 sized paper.
Let’s Draw!
Step 1: Start by drawing a smooth, curved line for the top of the beak, followed by a small curve for the bottom to complete it. Focus on getting the proportions right, as the beak’s shape is important for representing the bird accurately. Once the outlines are done, refine the curves to make the beak look strong and elegant.

Step 2: Next, draw smooth curves for the head, ensuring that each curve elegantly transitions into the next, capturing the essence of the human form. Pay attention to the proportions and the contours, as these will create a more realistic depiction. Start with a gentle arc for the forehead, followed by a soft curve that defines the cheekbones, and finally, an inviting line for the chin. This approach not only enhances the overall shape but also adds a sense of character to your drawing.

Step 3: Draw two large circles for the eyes to create a friendly look, making sure they are spaced apart for an approachable expression. Inside each eye, add a big circle for the vibrant iris, using warm colors like bright blues or lively greens. Then, include a small circle for a sparkle that adds charm to the gaze; this detail can greatly improve the overall appearance. Position the sparkle at the upper part of the iris to mimic light reflecting off the eyes, enhancing the character’s friendliness.

Step 4: Draw a wing on the right side of the body using a curved line that loops back to the bird’s side. Make the curve look like a bird’s wing, with a smooth arch that suggests its shape. Start by sketching a gentle curve from the shoulder area, sweeping outwards and then back towards the body. This motion hints at the bird’s ability to fly and adds interest to your drawing. Add simple details along the edge to represent the feathers, enhancing the wing’s realism and bringing your bird illustration to life.

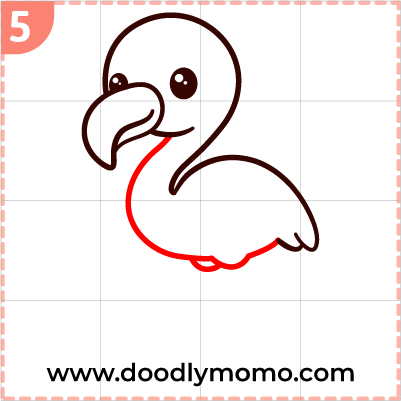
Step 5: Draw a big oval shape for the body, wider at the bottom for a cute, chubby bird look. This shape is important for the design and adds to the bird’s friendly appearance, making it instantly likable and approachable. You want to ensure that the curves are smooth and gentle, enhancing the overall cuteness factor.
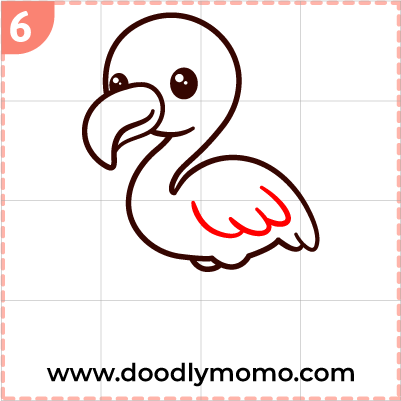
Step 6: Draw small curves to represent the feathers for the wing’s details. Make sure each curve follows the natural shape of real feathers. Vary the length and width of the curves to add more texture and depth to the wing.
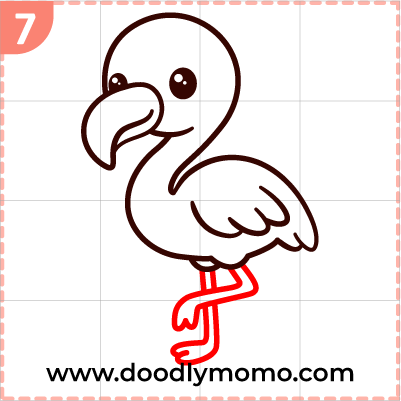
Step 7: Lastly, draw the two long legs of the flamingo, ensuring that they are elegantly elongated and gracefully positioned to reflect the bird’s natural poise. To begin, create a gentle curve for the first leg, which should taper slightly as it approaches the body, capturing the delicate structure of the flamingo. For the second leg, mirror the same curvature and flow, allowing it to appear bent as if the flamingo is standing gracefully in shallow water. Pay attention to the details, such as the small joints that connect to the body and the way the feet spread out elegantly, showcasing the unique features that make the flamingo distinct.
Here are all the detailed steps for your easy reference, ensuring that you can follow along without any confusion as you work through the process. Each step is meticulously outlined to provide clarity, allowing you to navigate through the procedure with ease and confidence. By following this structured approach, you will minimize the chances of making mistakes and increase your efficiency as you progress. Feel free to refer back to this guide whenever you need a reminder or a clearer understanding of the process.

Did you know?
Flamingos are famous for their bright pink feathers, but they aren’t born that way—they get their color from the food they eat, like shrimp and algae! These long-legged birds love to stand on one foot, and scientists think it helps them stay warm or balanced. Flamingos live in large groups called colonies, sometimes with thousands of other flamingos! They’re also great at filtering food from the water with their special beaks. With their funny poses and fancy feathers, flamingos are some of the most unique and colorful birds in the world!

Here’s some more kid-friendly information:
- Flamingos are pink because of what they eat! Their favorite foods like shrimp and algae have special coloring.
- They often stand on one leg, and scientists think it helps them save body heat or rest their muscles.
- Baby flamingos are born gray or white, not pink—they change color as they grow.
- Flamingos live in big groups called colonies or flocks, sometimes with thousands of birds!
- They use their beaks like filters to scoop and strain tiny food from the water.
- Flamingos sleep while standing up, often on just one leg!
- They are strong flyers and can travel long distances in search of food or warm weather.
- Flamingos love shallow lakes and wetlands, where they can wade and feed easily.
- Their knees bend backward, but what looks like their knee is actually their ankle!
- Flamingos are very social birds and love being around their flamingo friends all the time.
📌We are in Pinterest too! Check us out and save our pins as reference! ♥
You can also check and buy vector files and images from our Adobe Stock link below, where you’ll find a diverse collection catering to all your creative needs, ensuring that you have quality visuals for any project, whether it be for web design, marketing, or personal use.
Thank you for reading! We hope you found this article insightful and enjoyable. Please have a look at our other step-by-step tutorials, where you can discover a variety of adorable dog breeds, including tips on training, grooming, and care. Whether you’re a seasoned dog owner or considering bringing a new furry friend into your home, our comprehensive guides are designed to help you along the way. Happy Drawing!


Leave a comment