“Not all royalty wears crowns — some wear whiskers and walk on silent paws through ancient forests.”
Step By Step Tutorial
This tutorial invites you to celebrate the gentle nature of Norwegian Forest cats through engaging drawing steps. It emphasizes creativity while capturing their affectionate qualities. Useful tips and materials are provided, making this an enjoyable and accessible experience for all. Embrace the joy of drawing and the companionship of these charming pets. 🐱
Don’t forget to prepare your materials. Please see my post on how to use the Grid Line Method here. By the way we have prepared a free downloadable Grid Lined Paper that you can use, click the link to download a copy. Please note that these free downloads are intended for personal use only.💖
You may print it on an A4 sized paper or if you want to draw on a smaller scale, you may print 2 copies on one A4 sized paper.
Let’s Draw!
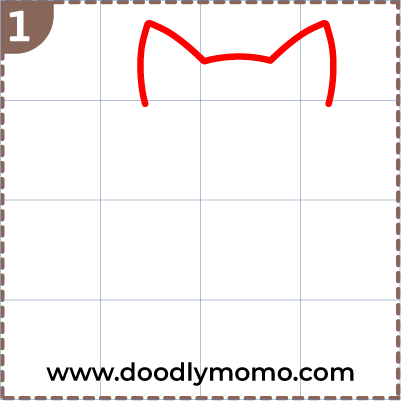
Step 1: Start with a rounded shape for the head — make it slightly wider at the top for a cute look. This shape will be the base for the character’s face, giving it a friendly feel. Next, draw two large triangle ears on top at an angle to give it character. These ears should be big enough to stand out and fit well with the head’s shape. You can also add some details inside the ears to make them look more interesting.
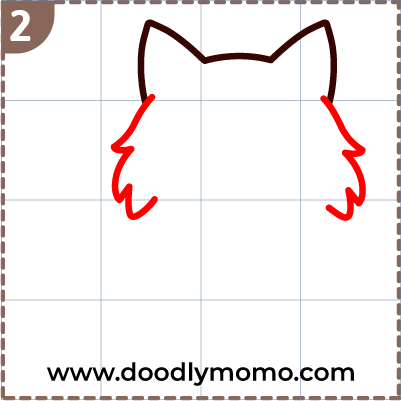
Step 2: Draw zigzag lines on both cheeks of the Norwegian Forest cat to show the texture of its fur. These lines should be slightly curved and different lengths to capture the fluffy look of the cheeks, which give this breed its lovable appearance. Make sure to angle your zigzag lines to add depth, allowing them to flow naturally into the rest of the cat’s face. This detail will improve the realism and character of your drawing.
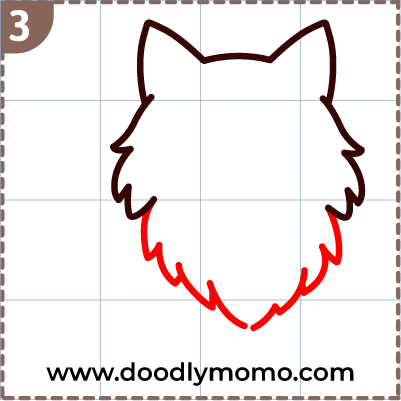
Step 3: From under the head, draw a fluffy outline going down — this is the body. Give it a soft, rounded shape to capture the character’s cuteness. Use zigzag curves to represent thick fur and create a lively texture. As you draw the body, add small variations in the zigzags for depth and to suggest different fur layers. Small bumps along the outline can help show the character’s form, making it look cuddly and inviting.
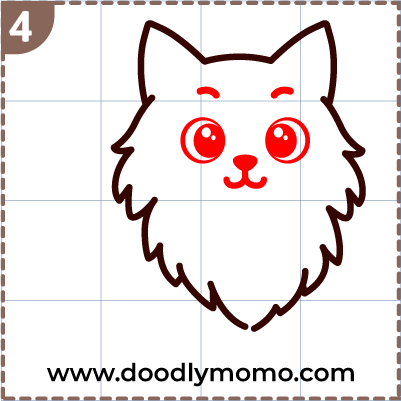
Step 4: Draw two large round eyes that show the expression you want. Inside each eye, add a small white circle for shine to make them lively. Add two small curves for the eyebrows to enhance the character’s emotions. Below the eyes, draw a small oval or triangle for the nose, keeping it centered for balance. Ensure the nose is a good size compared to the eyes and cheeks. Below the nose, draw a short line down, then curve both sides into a cute smile that gives your character a warm and friendly look. This smile should make your character appear happy and welcoming.
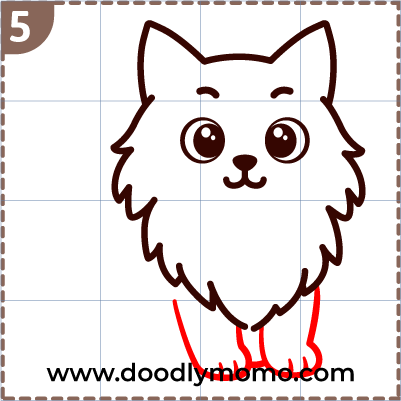
Step 5: Add the front legs as two simple, vertical curves with small paws that match the body size for balance. You can add small details like claws or paw pads for a touch of realism. Position them to show either movement or stability, giving your drawing a lively look. Ensure the curves are smooth and natural, reflecting the simplicity and grace of the legs.
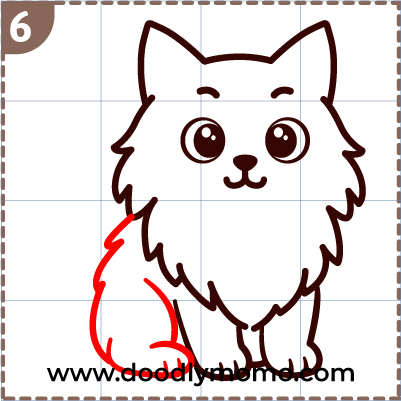
Step 6: Draw the back leg as a bent curve behind the front leg on one side, capturing the animal’s natural pose. Start with a soft curve that connects to the body and matches the angle of the front leg for balance. Focus on the leg’s thickness and any fur texture to enhance realism. Consider how weight shifts to create a more dynamic and lifelike pose.
Step 7: On the side, draw a big fluffy tail that sweeps down. Use bumpy curved lines to make it look soft and puffy, varying the line thickness for depth. Add curves on the ears for extra detail, highlighting their shape and structure. Include gentle curves below the face to show the fur’s texture, giving it a soft and charming look.

Here are all the detailed steps for your easy reference, ensuring that you can follow along without any confusion as you work through the process. Each step is meticulously outlined to provide clarity, allowing you to navigate through the procedure with ease and confidence. By following this structured approach, you will minimize the chances of making mistakes and increase your efficiency as you progress. Feel free to refer back to this guide whenever you need a reminder or a clearer understanding of the process.

Did you know?
The Norwegian Forest Cat is like a fluffy fairy tale creature from the snowy woods of Norway! With its thick, warm coat and big furry paws, it’s built to stay cozy even in cold winter weather. These cats are amazing climbers and love to perch high up like little tree ninjas! People even believe they traveled with Vikings on ships long ago. Even though they look wild and magical, they’re super gentle and loving — the perfect mix of adventure and cuddle!

Here’s some more kid-friendly information:
- Large and Muscular: Norwegian Forest Cats are one of the largest domestic cat breeds, with males potentially weighing around 19 pounds.
- Waterproof Coat: Their double coat, consisting of a long, glossy top layer and a woolly undercoat, repels water and helps them stay warm in the cold.
- Distinctive Head and Ears: They have a triangular-shaped head, almond-shaped eyes, and large, tufted ears that end in hair like a lynx.
- Climbing Experts: They are excellent climbers due to their strong claws and muscular bodies, according to WebMD.
- Love of Water: Some individuals enjoy swimming and playing in water due to their waterproof coats.
- Intelligent and Playful: Norwegian Forest Cats are known for their intelligence, curious nature, and playful personalities.
- Sociable and Adaptable: They are sociable cats that can adapt to various environments, making them good indoor pets.
- Not Necessarily Lap Cats: While they are sociable, they are not always as fond of lap-sitting as some other breeds.
- Vocal: While some breed associations classify them as quiet, they can be quite vocal.
- Excellent Hunters: They are skilled outdoor mousers with strong hunting instincts.
📌We are in Pinterest too! Check us out and save our pins as reference! ♥
You can also check and buy vector files and images from our Adobe Stock link below, where you’ll find a diverse collection catering to all your creative needs, ensuring that you have quality visuals for any project, whether it be for web design, marketing, or personal use.
Thank you for reading! We hope you found this article insightful and enjoyable. Please have a look at our other step-by-step tutorials, where you can discover a variety of adorable dog breeds, including tips on training, grooming, and care. Whether you’re a seasoned dog owner or considering bringing a new furry friend into your home, our comprehensive guides are designed to help you along the way. Happy Drawing!


Leave a comment