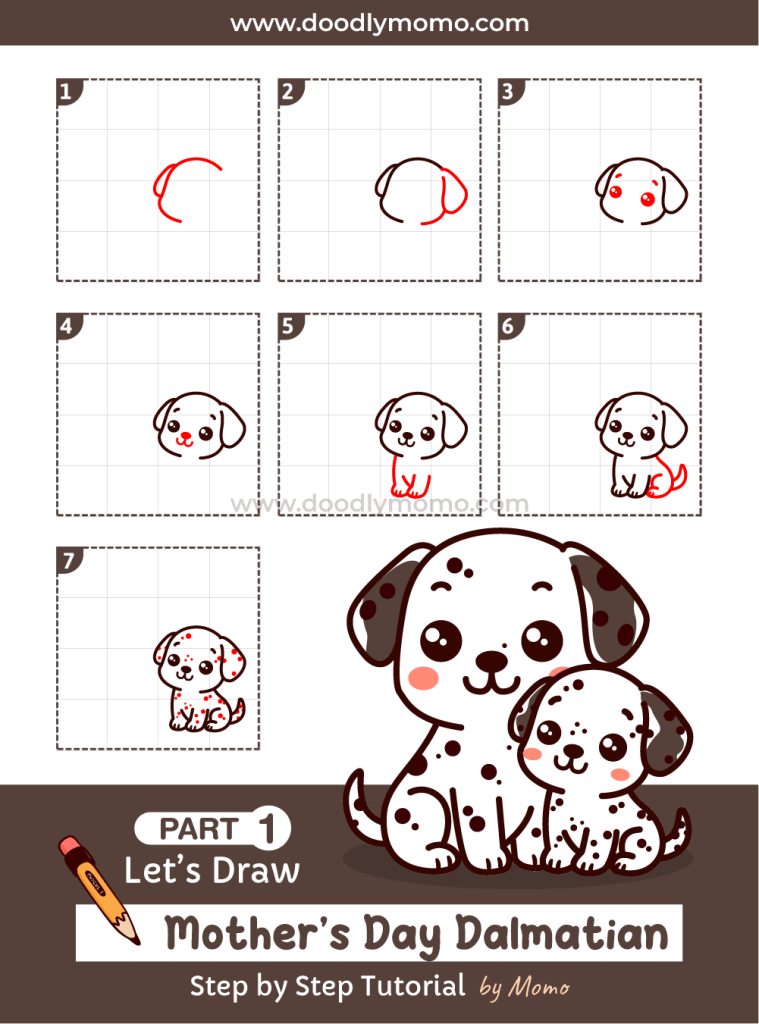
Step By Step Tutorial
Celebrate Mother’s Day with our engaging step-by-step tutorial that guides you in drawing a mother Dalmatian and her puppy! Join in this creative endeavor, suitable for all skill levels, fostering joy and cherished memories. Unleash your artistic spirit with free downloadable grid paper and explore the heartwarming bond between mother and pup! 🐶
Don’t forget to prepare your materials. Please see my post on how to use the Grid Line Method here. By the way we have prepared a free downloadable Grid Lined Paper that you can use, click the link to download a copy. Please note that these free downloads are intended for personal use only.💖
You may print it on an A4 sized paper or if you want to draw on a smaller scale, you may print 2 copies on one A4 sized paper.
Let’s Draw!
Step 1: Start by drawing a gentle curve that represents the top of the head of the Dalmatian puppy, ensuring that the arch is smooth and inviting. Then continue drawing the left side cheeks, allowing for a soft, rounded appearance that captures the puppy’s youthful expression. This will give the face a friendly and approachable look. Next, draw another curve for the left side ear, making sure to capture its unique floppy shape that adds to the charm of the breed.

Step 2: Draw a smooth curve that shapes the elegant outline of the right side ear, ensuring that it tapers gently towards the top for a natural look. Following this, sketch another curve that defines the structure of the right side cheek, allowing it to blend seamlessly into the jawline, creating a harmonious and balanced facial feature. Focus on achieving a graceful contour that will complement the overall facial proportions and set the stage for the subsequent details.

Step 3: Draw two small curves for the eyebrows, ensuring they have an appealing shape to give character to your drawing. Then, draw two circles for the eyes, making them proportionate to the face you are creating. Don’t forget to add some glares on the eyes; these highlights can bring life and depth to your drawing. Consider varying the size of the pupils for a more expressive look, and think about adding eyelashes for extra detail. This attention to the eyes makes them the focal point of your artwork.

Step 4: Draw a small oval for the nose of the puppy, positioning it toward the center of the face to give it an adorable look. This oval should be slightly flattened to resemble a real puppy’s nose closely, with a glossy finish if you want to add a touch of realism. Next, draw two U-shaped lines that curve gently downward for the mouth, ensuring they are symmetrical to create a happy expression. These lines should be soft and rounded, reflecting the joyful nature of puppies. You can also add a glare for the nose if needed, which will help it stand out and add a sense of depth to the puppy’s face. These thoughtful additions will create a more engaging and lively appearance, capturing the essence of puppy playfulness.

Step 5: Draw a curve line for the left side of the puppy’s body, ensuring it represents the soft, rounded shape typical of a playful puppy. Then, create a gentle curve for both front legs, showcasing their position as if the puppy is happily standing or preparing to play. As you work on the legs, take a moment to carefully add some intricate details for the paws, like the tiny claws that give the puppy its charming, youthful appearance. Consider adding a few lines to indicate fur texture, which will enhance the overall character and liveliness of your drawing.

Step 6: Begin by carefully drawing a smooth curve for the back of the puppy, ensuring it has a gentle slope that reflects the playful nature of the animal. Next, move on to sketching the back legs, making sure to capture their proportionate size and placement for a natural stance. To add detail, include additional curved lines for the paws, emphasizing their adorable shape and the small pads that will give character to your drawing. Finally, complete the illustration by drawing a pointy curve line for the tail, curving it playfully upward to convey a sense of excitement and joy, as if the puppy is happily wagging its tail in anticipation.

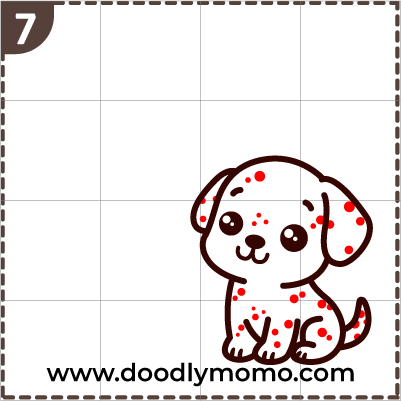
Step 7: Lastly, draw dots for the Dalmatian spots. Make a variations of small and big circles and ovals to create a natural look that represents the unique pattern of this beloved breed. Remember, no two Dalmatians are alike, so feel free to experiment with different sizes and placements to give your drawing character and life. You can also try varying the intensity of the dots by using lighter or darker shades to add depth. Once you’re satisfied with your spot placement, step back and admire your work! See you on the next part!
Here are all the detailed steps for the part 1 of this special tutorial, ensuring that you can follow along without any confusion as you work through the process. Each step is meticulously outlined to provide clarity, allowing you to navigate through the procedure with ease and confidence. By following this structured approach, you will minimize the chances of making mistakes and increase your efficiency as you progress. Feel free to refer back to this guide whenever you need a reminder or a clearer understanding of the process.
Please click here to continue on Part 2!
📌We are in Pinterest too! Check us out and save our pins as reference! ♥
You can also check and buy vector files and images from our Adobe Stock link below, where you’ll find a diverse collection catering to all your creative needs, ensuring that you have quality visuals for any project, whether it be for web design, marketing, or personal use.
Thank you for reading! We hope you found this article insightful and enjoyable. Please have a look at our other step-by-step tutorials, where you can discover a variety of adorable dog breeds, including tips on training, grooming, and care. Whether you’re a seasoned dog owner or considering bringing a new furry friend into your home, our comprehensive guides are designed to help you along the way. Happy Drawing!


Leave a comment